

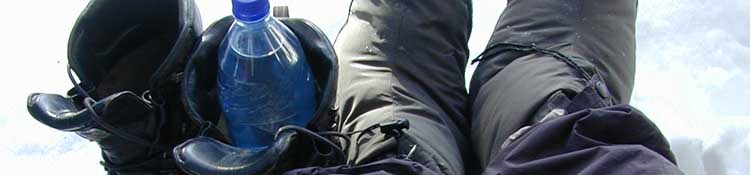
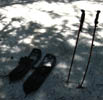
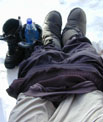
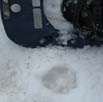
Morning down booties to heavy Winter Boots for travel. Must wear water. Stripping camp layers for brutal transition to travel. Burrrrr...
High Sierra
Backpacking
Trail Guide
Forums
Sierra
Weather
WeatherNotes Northern
Sierra Weather
Gear
High Sierra Backpacking Boots
Backpacking Boot Knowledge & Information
Wisdome begins with knowing yourself and your needs, including knowing the nature of what is available
Selection Guide
Languages
Trail Skills
Mountain
Safety
Food
Planning
Trail Arts
More
Information
Social
| Trailhead | GEAR PAGE | GETTING STARTED |
LAYERING | BOOTS | UPPER BODY INSULATION |
TRAIL SKILLS |
GEAR FORUM |
WEATHER | PLANNING |
This page is under construction
We Start
|
If you are following our backpacking conditioning program, you already breaking in a pair of boots. |
|||||
If you are starting from Scratch, let's figure out what you need by determining basic selection standards. Our training will introduce us to the character and needs of our feet. We need to match that with footwear. |
||||||
Tahoe to Whitney Members' Favorite
|
| Selecting Backpacking Boots |
||||||
| The Basics | Testing Boots | |||||
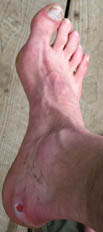
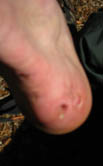
"May you walk long, far, That's the Goal Oh, my aching, bleeding feet... Deciding on the style of Boot that suits your feet, your walking style, and your specific requirements within the terrain is vital for a lifetime of backpacking joy. I have experienced foot problems. Plantar fasciitis, bunions, and structural problems with my foot bones and arches. I have also shattered a kneecap, lost a half-inch of one of the big piggies to frostbite, and broke a couple of ankle bones... I have recovered from all with rest, rehab, exercise, more rest, massage, therapy (careful work), more work, pain, rest, therapy again, work, and the proper footwear. REST My point here is that plantar facitis or shin splints can drop us as quickly, or even more quickly, than a break. Soft tissue problems in joints are more enduring than non-joint breaks. These problems require extensive and deep rest and recovery... In every case of use or recovery we need proper footwear. What that is for you is unique. What I hope to do here is lay out the parameters various environments present, so you can figure out just what you need to properly confront yours. Boots break down into three categories, being light, medium, and heavyweight. Each style is suited for a different use, and each is generally defined by its different use of a class of materials and approaches to construction style. And different applications. Construction Basic Pieces Shank It Balance of Factors Unique Shapes Thus the finest boot from one particular manufacturer may just not fit you. Or they may fit you perfectly. Your Bottom Line Your Needs Your particular application, type of foot, walking style, terrain, the weight load you are bearing, and your history are the critical factors in determining the proper footwear for you. Application Type of Foot Walking style Terrain Weight History Bottom Line II Problems, Problems, Problems The Threat Boom! Down goes the backpacker... For instance, when you roll your ankle over in a tight little drainage gully. This movement would normally be supported by a pair of medium-weight high top boots, but could possibly cause great pain and possibly even a sprained ankle in a pair of lightweight low-tops. I cannot count the number of times I've rolled my ankle on the trail and been spared a sprain by proper boot support. The long threat Don't expose your feet to the potential of long term damage or immediate injury by using inadequete footwear. On the other hand, there is such a thing as overkill. If your pack is fairly light, you are crossing tame, well-groomed trails, and you do not have any particular previous foot problems there is no problem with light and low footwear, as long as it provides the necessary level of support. The materials and construction used to build your footwear will determine how it will do on our stability and support flex tests. Size & Shape Every manufacturer deploys a different "shape," or number of shapes, to which they construct their boot's uppers. This shape is defined by the "Boot Last," which is the form to which the boot's upper dimensions are sewn. That's why some boots fit perfectly, and others don't... Example Weights & Measures Boot leather is measured by weight which translates into a thickness measurement. Da Upper But many light and medium weight boots do not use one piece uppers. Many light and medium boots have abandoned leather for fabric. They employ various pieces of both leather and fabric stitched together to form the upper. Check these "composite" uppers carefully. Multi-piece uppers are inherently less stable than one-piece uppers. Many boots that appear to be medium-weight boots are actually light-weight boots, due to the lack of support provided by multi-piece fabric uppers. Keep in mind that multi-piece leather uppers are less stable than one-piece uppers. Rubber Sole I have had problems with plastic shanks splitting. A fine pair of ASOLO one-piece medium-weight boots suffered this fate. The sole itself split shortly after the shank split. To add insult to injury, my apartment burned down, preventing me from returning the boots... The Result The only way to determine the support and stabiltiy level of trail footwear is to test it. See the next column for details of the flex tests. But the range of "weights" of backpacking footwear is generally typified by a stlye of manufacturing. Lightweights look like fancy heavy-duty tennis shoes, mediums look like light boots with multi-piece uppers, and heavyweight boots are your classic image of massive leather hiking boots. The Lights Right now we are seeing many hybrids mixing the elements of the trail-runner shoes with design elements employed by light boots. Lightweights are very popular. The Mediums Many "medium boots" now top classic hiking soles and mid soles with very light multi-piece leather and fabric uppers. If you don't watch out you can get less stabiltiy and support from a supposed pair of "medium" weight "boots" than a pair of high quality tennis-shoe style trail runners. The Heavyweights |
|
 |
The quality that divides
The Tests There are two tests for structural support that I use to test all backpacking boots. Both tests require that you grasp the toe of the boot in one hand, and the heel of the boot in the other hand. In the first flex test, you attempt to twist the boot's heel and toe in different directions. If the boot twists up like a pretzel, it is a pretzel, not a stable backpacking boot. In the second flex test, you attempt to fold the heel and the toe of the boot towards each other. If the boot folds up like a lawn chair, it will make a better lawn chair than a backpacking boot. When you are carrying a 50 lb pack and you are traversing a long, slanted slab you will be happy your boot passed test #1 When you are carrying a 50 lb pack and you wedge your foot between two rocks you will be really happy your boots passed test #2. Multiply these stressful foot positions while carrying a heavy load by the number of out-of-balance or akward walking incidents you experience every day on the trail, multiplied by your number of days on the trail. Then multiply this number by the amount of years you plan on being on the trail. This adds up to a lot of stress, and it does not even include the normal stresses that long distance backpacking puts on your feet. Without adequate foot protection these stresses will build up cumulatively over the years, potentially causing both structural and soft tissue injuries. Pick your boots for the long trail through life that your feet are already walking, not just the upcoming trip.
Boot Types Typically, the tennis shoe style hiking shoe dominates the lightweight class. The medium weight class is characterized by the mixed material multipiece-upper boot, with or without fabric ventilation patches sewn in.
Subtle Distinctions This means that the actual weights of the boots themselves rises significantly between classes.
What?
Pay Attention!
Brave New World
Close Inspection Note the construction details. How thick is the thread? Is it single or double stitched? How thick or thin is the leather? If you shop the sales like I do, you will wait until the style of boot you need, heavy or light, comes on sale. But if the boot does not have good stability and support when you give it the flex tests, or the support provided by the upper is insufficient for your application it is not a good deal at any price.
Fitting the Boot My standard set-up is a set of high arched inserts sitting on gel pads. If I am buying Winter boots, I bring a heavy pair of wool socks. For Summer boots I bring a medium or light sock. We should try on all potential boots with the same insert set-up and socks that we will use on the trail.
Decision Points A real difference between Lightweights against the Mediums and Heavies is break-in time and pinch points. Boot & Foot Eliminating Softness That's information I prefer to find during training, long before hitting the long trails.
Lightweights Yet their lightweight and generally low-topped uppers can significantly reduce foot and ankle support and protection in many circumstances where we are really going to want the upper to provide support and protection. Many lighweights also have low-tops, which I avoid because of the protection a high top gives against sprained ankles and endless rocks getting inside the shoes. Therefore I suggest that lightweight boot or trail shoes should only be used by backpackers carrying a very light load on high quality trails. I also suggest high-tops for the extra ankle support and protection. Rocks slash at us and try to get into our shoes. If we do employ trail-hiker style tennis shoes for long distance heavyweight backpacking, make sure they provide excellent stability and rigdity in the flex tests. Don't carry more weight than these lightweights can support when us and our feet get out of position.
A
Medium Weights The medium boots generally have more sole stability than a "lightweight," but that will only be determined by testing. I am constantly surprised by boots that present themselves as "medium" boots which have weak uppers and almost no sole rigidity. A solid pair of medium weight boots is my standard selection for long distance backpacking carrying a very heavy pack. These boots will have a medium thickness one-piece leather upper. Boot leather is measured by weight which translates into a thickness measurement. A medium leather is around 2 mm thick and weighs in at 5 to 5.5 oz.
Heavyweight A heavy leather is up to 2.4 mm thick and weighs in at 6 to 6.5 oz.
Conclusion The disadvantages are that we may sacrifice sole and upper stability and support for a lighter weight.
|
|||
 |
||||||
 |
||||||
 |
||||||
 |
||||||
 |
||||||
 |
||||||
 |
||||||
 |
||||||
 |
||||||
 |
||||||
 |
||||||
An Excellent guide to Boot Construction |
||||||
 |
||||||
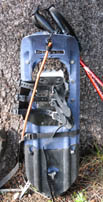
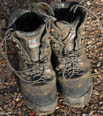
| 2009's 955 Mile Boots |
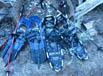
These light/medium Vasque boots did two Tahoe to Whitney trips, one in 2009 and the other one in 2001. I used a different very comfortable Asolo medium boot during the 2002 Tahoe to Whitney backpacking trip, but their internal sole piece split almost immediately after their first re-sole. Jeeze. I liked those fkers.
This year, in addition to the 470 mile Tahoe to Whitney trip, these poor light/medium weight boots did 131 very wet early Spring miles at Lost Coast, and 181 miles in Fall between Meeks Bay and Tuolumne Meadows, as seen in the action photo above. I entertained the thought that I might finish that hike on my fording/camping tennis shoes. Between trips I sealed up all the cracks and splits in the boot with that nasty fix-all, Shoe Goo. Love that Stuff... |

Last page: Next page:
Dl |
THIS PAGE IS COME ON BACK NOW, 'YA HEAR? Next page: |
Backpacker ForumsHave a great Sierra Nevada route or trip to relate?Post it on Experiences, comments, or pictures about this Section: Let it Rip HERE: Forum |
Trailhead
Contact
Alex Wierbinski
Backpacking Lake Tahoe to Mount Whitney
Your guide to the High Sierra Crest, including the Tahoe to Yosemite, Pacific Crest, and John Muir Trails